


Rhythm
-
Posts
28 -
Joined
-
Last visited
Content Type
Profiles
Forums
Gallery
Store
Events
Posts posted by Rhythm
-
-
messing with my throttle makes me just a little bit on the nervous side.
I use to feel the same way when I picked my nose as a kid. :grin:
-
i think i get how it works but not completly sure, so it goes inbetween the throttle and the throttle bar end? there for keeping it tight enough so it doesnt move?
Yep, that's about it.
-
How hard is it to turn this thing while keeping the throttle where you want it, with one hand?
Its very easy to turn the throttle with your hand when the lock is engaged. There's just enough pressure to keep the throttle from sliding on it own when you engage the throttle lock with your pinkie.
-
Very cool! I didn't have the time or ingenuity for $20..$40...$100 worth of tools and fabrication or retail solutions before my Deals Gap trip last year.. So I resorted to the poor mans throttle lock.. Caterpillar o-ring.. $8.. When coupled with my cramp buster I get enough friction and it holds well enough.. It can slip a little but I prefer not having my hand off the throttle side for extended times so the slow slippage isn't really that big a deal for me.. This combo allows me to simple rest my hand on the bar and allow easy adjustments during slight elevation changes on the slab.. Yet it still allows for full throttle movement in braking situations..
Roll it between bar end and grip to lock in.. Roll it back onto the stock bar end groove to take it off.. Not as solid as an actual throttle lock solution but functional and no mod needed..

No sweat Armith. Been there did it with the Vista, O-ring and even tried a car cruise controller.
 But I eventually toss it cause it was taking up storage space.
When I roll out of town I usually rack the miles up on my way back home from trips and I normally ride non stop til I get back home. Longest ride non stop was about 1800 miles coming back from Mt.Rushmoore. I couldn't have done it without my throttle lock.
This mod beats them all.
As implied this is for those who have the time and enjoy doing there on mods.
-
Godspeed.

-
just as an alternative, one could always get this (and there are several websites that carry this)
http://www.mymcgear.com/browse.cfm/4,18554.hml?AFF=690MCG
$20. Though they don't make it for ALL models, they do cover most... i was able to get one for my aprilia without any issues, for instance.
Yeah, those suck on the Busa. Dayyyumm thing only holds for a few seconds and then starts to slip slowly. The Throttlemeister (which cost too much) and my version will hold permanetly!!!
-
Dayyyumm, can a moderator please move this to the HOW TO section?
Thanks
This is an old post (DIY) I did a few yrs ago on another site. Thought some you would enjoy doing.
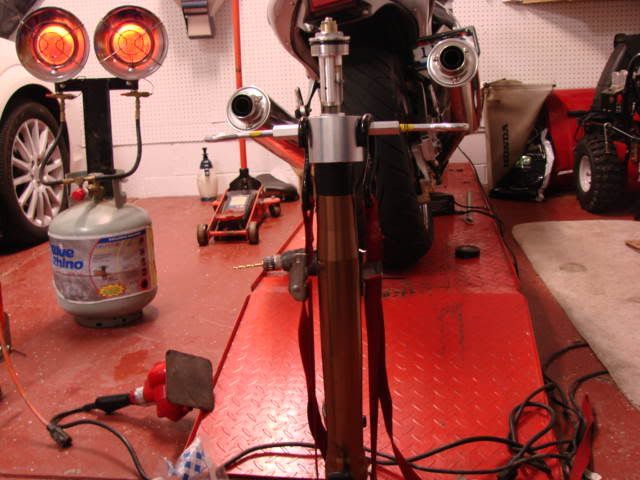
Ok Playaz, after a whole summer of trial and error I'm satisfied with my final results of my homemade throttle lock/throttlemiesters .
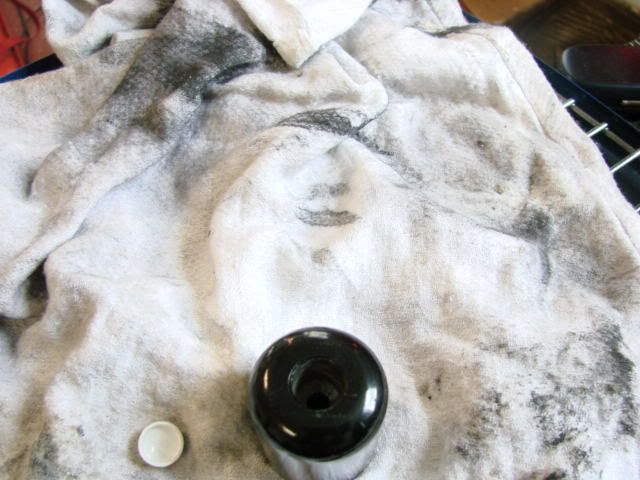
For under $40 invested in a 8mm helicoil set, drill press for counter sinking *the barend to accomodate a 8mm phillip bolt,oil cap with a hole punch in the center and some quality time with Medusa and my grandson learing the ropes watching closely, I finally got the chance to finisher up.
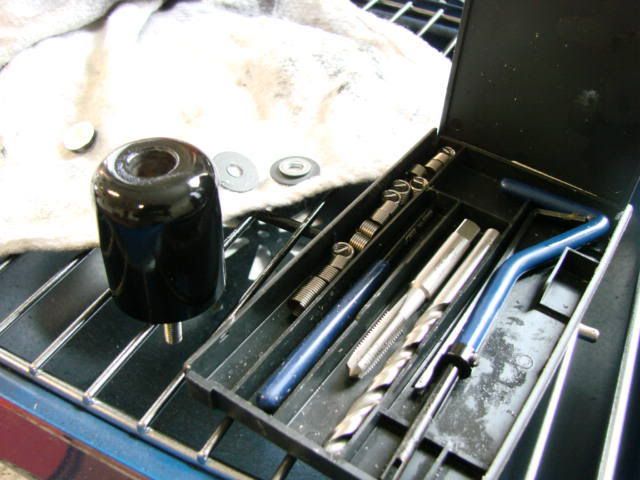
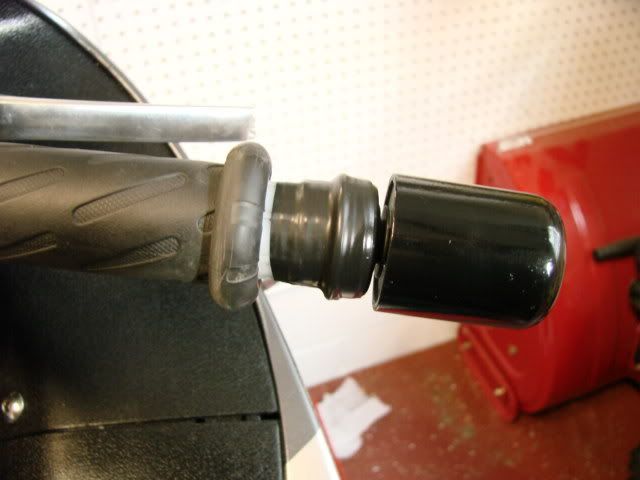
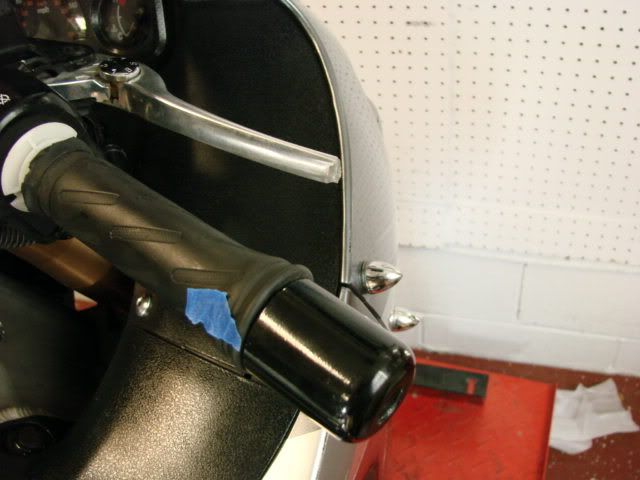
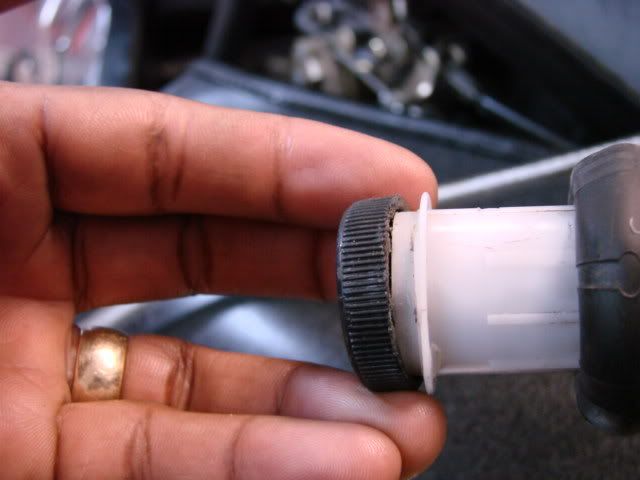
The basic principle is to cause friction between the barend and aluminum handlebar under the white plastic lever (throttle), causing the throttle to lock when enough pressure is applied to *the oil cap after the barend has been turned in a clockwise (locking it in place between the barend and aluminum handlebar under the plastic throttle) or *counterclockwise (unlock) to disengage the throttle. To do this I just used an oil cap sanded down to the point when mounted onto the white plastic handle it will butt up against the raised plastic lip at the end of the throttle (white part of the throttle or 2nd photo below) with no space in between on the white throttle underneath the rubber grip and aluminum handlebar. Basically, the inside of the oil cap will be touching the lip on the white lever and the end of the handlebar where the the barend screws *into.*When you roll back the rubber sleeve it will be present what I'm talking about. Next, place the cap *onto the end of the plastic sleeve and wrap black electrical tape around it and the white plastic throttle several times so it wont slip when you compress (turn) the barend (shown in the photo below)... *This is where the fricton point will be when the throttle is locked into position when the barend is rotated in a clockwise motion.

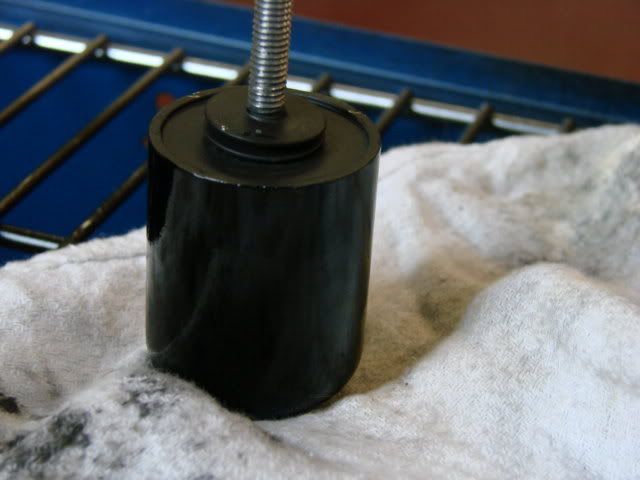
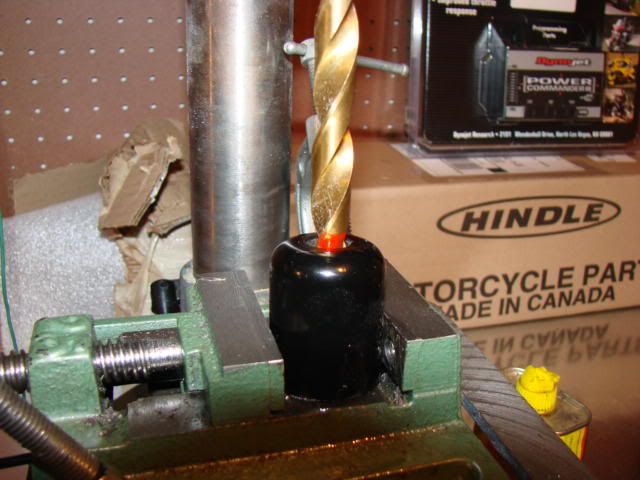
So on that note....... I just basically tap the inner hole on the barend with the supplied tap in the heli coil set. Then I used the supplied tool to screw the heli coil into the inside barend hole , thats it. *
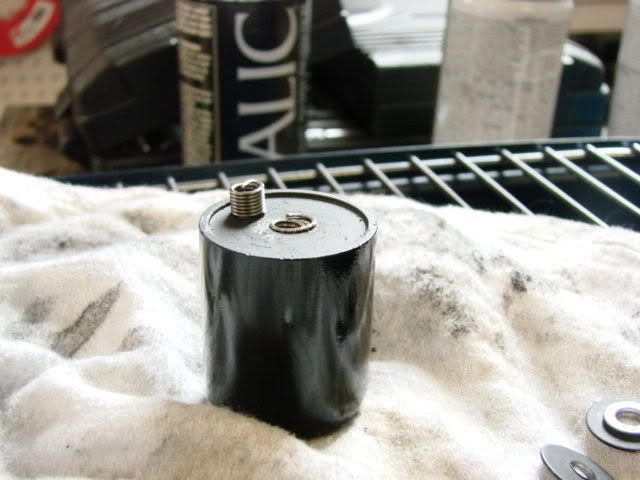
Next, I counter sunk the *outside barend hole far enough so the phillip bolt head would bottom out to help keep it in place with some locktite applied to the bolt. *By counter sinking the bolt just enough will *help with less rotation when engaging the barend. If you find yourself rolling it to much just add washers until you have it right. Hopefully you won't need to add no more than three washers to your bolt threaded through your barend.
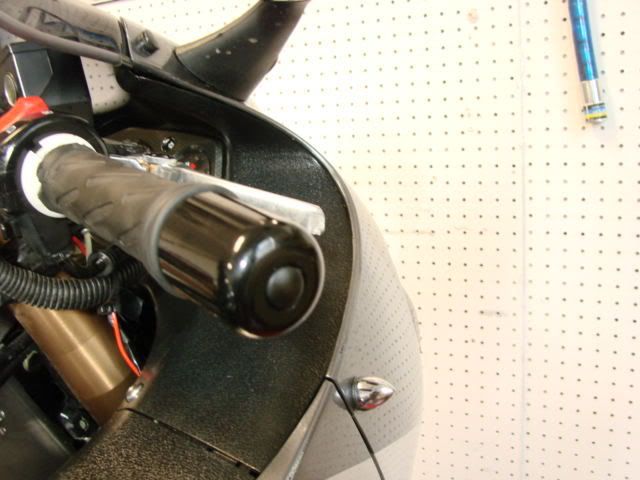
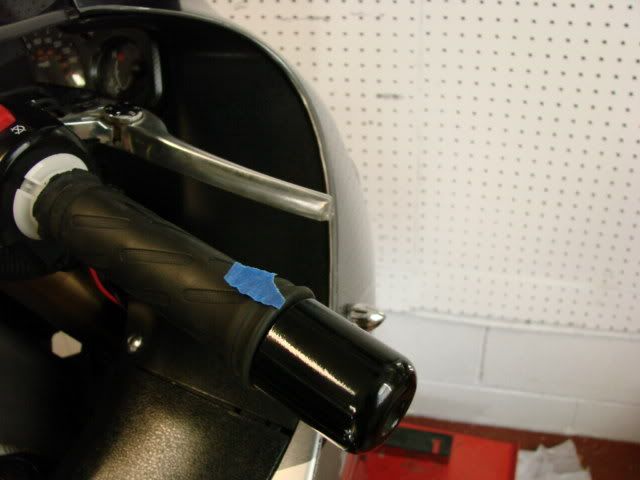
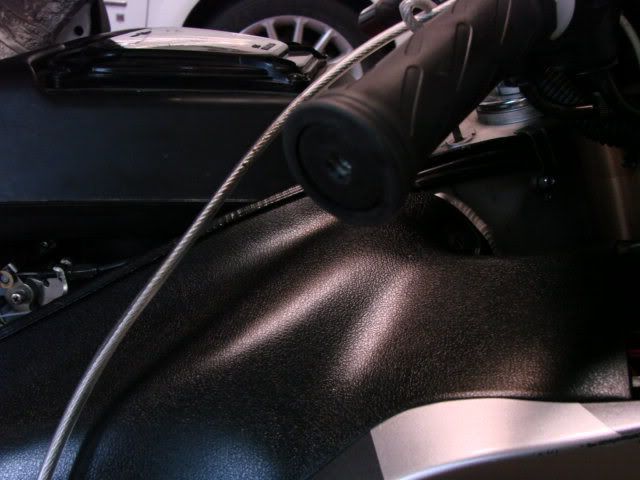
Here are some photos of the finished product. *BBBUSA and Dudewizer can vouch for the smooth operation and dependability, except for one minor setback during my test and tune stages (remember Brian.... duck *
 )
)Also, here are two photos marked with blue tape showing the throttle *in normal and a locked position.
What do you guys think !
And for you Homo's laughing at my busted up front brake lever, how this for a replacement. Thats right, a brembo, Charles hooked me up with last month. Still trying to find the time to put it on *
 .
.

countersink the hole in the bar end? *How long is the phillip bolt? *And where did you get that plug in the end of your bar end? *Awsome Mod!!!!!!
 </div>
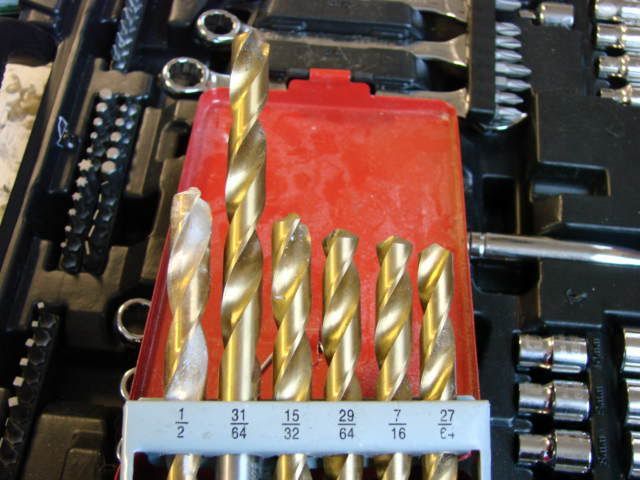
Drill size will depend on the size of your bolt head. A 31/64 drill worked for me.
The size of the phillip screw was cut to a 2.25"
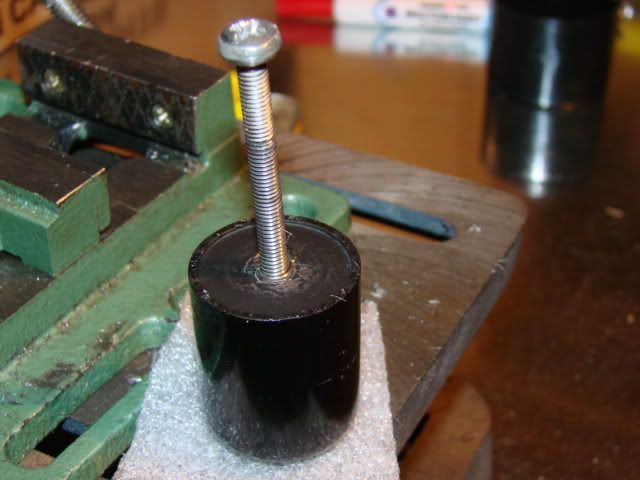
Depth of the hole in the barend is 5/8 deep (use cutting oil when drilling your hole).
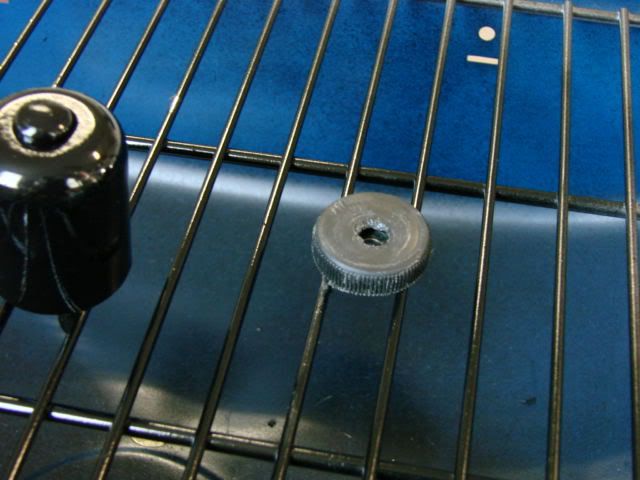
The plug in the barend is one of those bolt cover caps you can get at an automotive store that comes in colors of chrome, white or black. The cap is a two piece design but I only used the top cover portion.
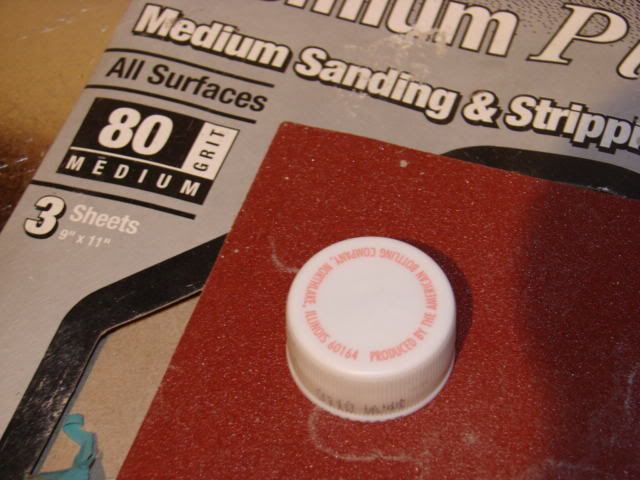
To make the oil cap fit properly I just slid the cap back and forth across a sheet of 80 gret sand paper til I got the correct depth to fit on top the white throttl end touching the aluminum barend.
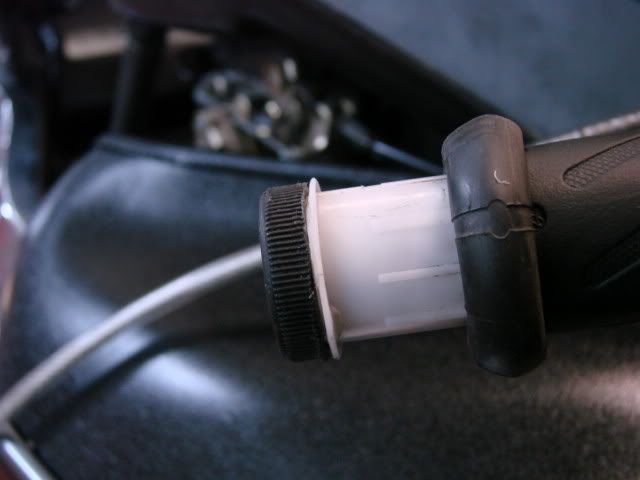
Finished up with black electrical tape.
Here's the original version (Throttlemeister) and cost more.

-
on the same line of question, mine are already done but there are spots in the aluminum which looks like shit if you are up close what would be the best method to remove them and get the shine up a bit more..
I tried mothers and the powerball which helped but not enough for my liking
Hard to suggest at the moment. Can you post a photo of the area you're having trouble with?
-
Your wheels look great!
Did you do this with the tire mounted?
Yep!
-
Alright, this may sound like a stretch but true. I usually only ride non stop when I'm heading back home from my trips. My longest stretch was from North Dakota to Columbus, Oh back in 2005. Total miles, estimated 1800 and 23 hrs. Stopped only for gas, munchies and to relieve myself
Next long haul was 1500 mi from Nova Scotia (Cape Breton Island) back to Columbus, OH. Stopped only for gas, muchies and to relieve myself total time 28 hrs. On the way back from NS the rain and fog especially during the night caused the delay in me getting back any sooner.
-
Welcome aboard Bud!!
What....You mean the Sammy's never told you about this place....or Dweez?!?
Hey.....Was that your trip to Nova Scotia I was lookin' at on the IC website last year? Pretty sweet!
Yeah, Sammy some times don't like to pass the good stuff around.

Thanks! Last yr trip was a two week solo trip up north rolling around the New England area (White Mountains), Prince Edward, and Nova Scotia. Nothing but good memories. I usually like to get my knees in the air and roll out every other yr somewhere asfar away from home. Next trip during 2010 will be to Oregon (Marys Hill Loop), Ca., NV (Death Valley, Arizona (Petrified Forest National Park) and back home.
-
THat's pretty cheap for two. Me and my club bro (BBBUSA) did our Busa's last yr our self. We did save some but not much. Unless you like tinkering around I would shell out the $110. You'll also need a special compression tool or make your own like we did.
BBBUSA mod together a homemade cylinder compression rings from Home Depot part used to clasp the fork cartridge while compressing with tie down straps. Only other tools really needed is a long tube syringe you can by from Mjiers to replace the fork oil to a specified level and a thin piece of wire to hold the push rod.
-
Here's my .02. I don't have any experience using it but the price is right. However, if it is as dependable as my Harbor Freight MC table lift and wheel chock you shouldn't have any problem using it.
http://www.harborfreight.com/cpi/ctaf/displayitem.taf?Itemnumber=99701
Oh yeah, they're local with two store in Col, OH.
-
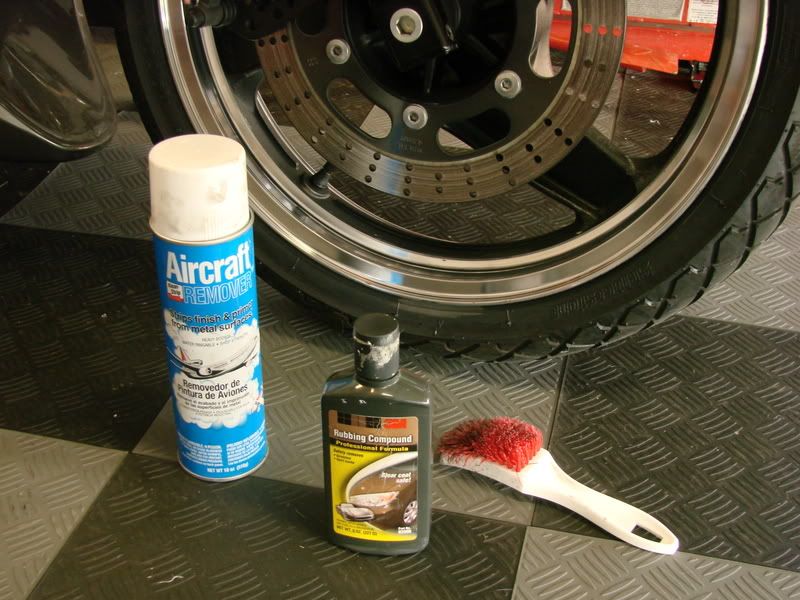
Here's a rim polishing DIY I've done on another site, using my wife bike.
OK folks, I know there's a few here that don't like the bling factor but for those who would like to add a little bling. My simple RIM polishing DIY.
Another intimidating but simple mod to do. The only equipment required is a nylon brush,3m rubbing compound,news paper, and a two cans of air craft paint stripper.
First, cover anything near the rim you don't want paint removed. The rim lip is a painted surface, while the center part of the rim is powdercoated, so don't worry about masking off or covering the center part with news paper or anything. If it would ease your mind go ahead, but trust me its going to take a acid bath dip to remove the covering on the center of the rim.
Shake the can of Aircraft stripper for a couple of min then apply by spraying on the rim lip. Let it set for a couple of min then remove the lifted paint with a rag or paper towel. Reapply til most of the paint is removed. The stubborn spot will be removed using more aircraft stripper and the nylon brush scrubbing the area that did not lift with a simple wipe from your rag or paper towel.
It should only take you 20 mins to polish a rim lip and 5 mins to rub it out to a nice shine using 3m rubbing compound for clear coat paint.
That's all Folks and enjoy.
-
notice how he is looking to the right while turning left lol
He saying cheeeeeezzzzzzz to the cameraman. :grin:
-
From one newb to another. Wuzzzzzzzzzz up
-
welcome!
what's this independent connection thing? is it a gang of motorcycle pirates who wrench on the side? is that it?
What, you never heard of ICMC?

ICMC is a loosely knitted group of some of the baddest MOFO Rydaz out there from all over the world.
 The ICMC was Founded by BBBUSA and myself in 2007. Starting in Ohio and spreading internationally.
 Here's our Philosophy

-
what up
Whud Up Dawg, and thanks for the invite. I didn't now this joint existed til you told me. Great site!!!
-
What's up new guy? Might meat you Saturday.
Letz hope the weather hold up.

-
Cant make it. Got a too much shit going on. Wish I could. You going to the Bash?
Brendnap (in New Hampshire) just asked me too, but I don't think so.
-
You found 'em!!!


I know thatz right. :grin:
-
What up Ty
Whud up son!
You going to the Dyno event tomorrow? -
Wuz up Champ!
-
Right in between both at Lewis Center. Wuz UP.
Homemade Throttle Lock
in Tech and Tips
Posted
That's it.