92Supra Posted March 26, 2012 Report Share Posted March 26, 2012 Very nice man! Quote Link to comment Share on other sites More sharing options...
XChris1632X Posted May 23, 2012 Author Report Share Posted May 23, 2012 My headgasket is smoked. I can't even pull the truck out of the garage without pissing a quart of oil from the head. With the addition of the new injectors, the headgasket didn't last 1 complete full throttle run. http://i282.photobucket.com/albums/kk251/XChris1632X/Toys/Hannah/IMAG0443.jpg http://i282.photobucket.com/albums/kk251/XChris1632X/Toys/Hannah/IMAG0444.jpg Oil is everywhere. This has lasted longer than I expected it to last. I am still running on stock headbolts that have never even been retorqued. To assure that this never happens again, I made a hefty investment: $1,300 in headstuds. Thats a big coin for a box of nuts and bolts http://i282.photobucket.com/albums/kk251/XChris1632X/Toys/Hannah/IMAG0496-1.jpg http://i282.photobucket.com/albums/kk251/XChris1632X/Toys/Hannah/IMAG0497.jpg There are two types of headstuds that ARP offers for the Cummins engines. There are the standard 420's which commonly hold up to 800hp and are less than $500. The next step up are these ARP 625's. These studs have been proven stronger than the block and have been known to pull the threads from the block before breaking. Quote Link to comment Share on other sites More sharing options...
XChris1632X Posted May 23, 2012 Author Report Share Posted May 23, 2012 Obviously I intend to use the upgraded head studs to keep the head pulled down and ensure that I don't have this problem again but I also decide to go ahead and add the external wastegate. Now I will be able to tune the truck to the drive pressure and hopefully be able to achieve someone close to a 1:1 ratio of boost to drive pressure. I have been planning on adding this wastegate since I bought the turbo and I need it to keep from overspeeding the turbo with the nitrous. http://i282.photobucket.com/albums/kk251/XChris1632X/Toys/Hannah/IMAG0447.jpg http://i282.photobucket.com/albums/kk251/XChris1632X/Toys/Hannah/IMAG0448.jpg Since I will have the head off and everything disassembled, I decided to upgrade exhaust manifolds. My turbo is a t4 and the stock manifold is a t3 design. Instead of getting a t3 to t4 adapter for the wastegate, I opted for the t4 manifold which should flow a little better up top. This is a one piece stainless steel t4 design http://i282.photobucket.com/albums/kk251/XChris1632X/Toys/Hannah/IMAG0446.jpg I just got all the parts in so I haven't had a chance to go any further. I hope to have the head tore off before the end of the week. Quote Link to comment Share on other sites More sharing options...
Alex L. Posted May 23, 2012 Report Share Posted May 23, 2012 What size gate is that? Quote Link to comment Share on other sites More sharing options...
XChris1632X Posted May 23, 2012 Author Report Share Posted May 23, 2012 50mm Quote Link to comment Share on other sites More sharing options...
BigOxley Posted May 23, 2012 Report Share Posted May 23, 2012 i was wondering where you were with the this. i got 625s for my car too. Quote Link to comment Share on other sites More sharing options...
XChris1632X Posted May 24, 2012 Author Report Share Posted May 24, 2012 i was wondering where you were with the this. i got 625s for my car too. How much were they? I haven't touched the truck in 3 months. I have beeb busy. Now I am also trying to get the fishing boat cleaned up, the wake boat, and the jet ski ready for some good weather. The quads aren't even in the picture anymore. Quote Link to comment Share on other sites More sharing options...
BigOxley Posted May 24, 2012 Report Share Posted May 24, 2012 400-ish, but there were only 12 studs. Quote Link to comment Share on other sites More sharing options...
XChris1632X Posted June 6, 2012 Author Report Share Posted June 6, 2012 400-ish, but there were only 12 studs. Yeah, I have 26 studs. I moved the truck back into the shop to start tearing it apart. Just driving it in, it is pissing oil worse with every start up. Hopefully this is the last time that will be the case. http://i282.photobucket.com/albums/kk251/XChris1632X/Toys/Hannah/IMAG0509.jpg http://i282.photobucket.com/albums/kk251/XChris1632X/Toys/Hannah/IMAG0510.jpg Started tearing it apart http://i282.photobucket.com/albums/kk251/XChris1632X/Toys/Hannah/IMAG0521.jpg I found the cooling system was starting to fill with oil. If you notice the thermostat you can see oil laying on top. http://i282.photobucket.com/albums/kk251/XChris1632X/Toys/Hannah/IMAG0528.jpg Couple more small things to pull apart and the head will be ready to come off. Having time to work on this shit isn't easy with a wife and kids. http://i282.photobucket.com/albums/kk251/XChris1632X/Toys/Hannah/IMAG0526.jpg Quote Link to comment Share on other sites More sharing options...
XChris1632X Posted June 8, 2012 Author Report Share Posted June 8, 2012 Finally got some time tonight to make some progress. http://i282.photobucket.com/albums/kk251/XChris1632X/IMAG0530.jpg http://i282.photobucket.com/albums/kk251/XChris1632X/IMAG0531.jpg http://i282.photobucket.com/albums/kk251/XChris1632X/IMAG0533.jpg You can see where the gasket let go and was making all of the mess http://i282.photobucket.com/albums/kk251/XChris1632X/IMAG0532.jpg http://i282.photobucket.com/albums/kk251/XChris1632X/IMAG0534.jpg Very impressed by the look of the pistons and the cylinder walls. This engine has 210k hard miles on it and constantly sees over 1800 degrees. I was expecting to find that it was time for a new motor. Atleast signs of some real wear. http://i282.photobucket.com/albums/kk251/XChris1632X/IMAG0535.jpg Pictures don't do justice. My cell phone only takes good pictures when it wants to. Quote Link to comment Share on other sites More sharing options...
Rgreen Posted June 8, 2012 Report Share Posted June 8, 2012 That motor looks really good for the miles and abuse Quote Link to comment Share on other sites More sharing options...
trix-storm Posted June 8, 2012 Report Share Posted June 8, 2012 Looks damn good! Gotta love those motors Quote Link to comment Share on other sites More sharing options...
Fubar231 Posted June 20, 2012 Report Share Posted June 20, 2012 If you got oil in your coolant and vice versa you might want to drain the oil and check your bearings. A lot of the time when coolant gets in the oil a spun bearing is in the near future. Thats what happened to my supra, after the 2nd MHG went coolant got in my oil, got the car rebuilt/put back together (The top end) only to drive it for a few miles then it spun one of the bearings. Quote Link to comment Share on other sites More sharing options...
XChris1632X Posted July 9, 2012 Author Report Share Posted July 9, 2012 If you got oil in your coolant and vice versa you might want to drain the oil and check your bearings. A lot of the time when coolant gets in the oil a spun bearing is in the near future. Thats what happened to my supra, after the 2nd MHG went coolant got in my oil, got the car rebuilt/put back together (The top end) only to drive it for a few miles then it spun one of the bearings. Yeah I have been there. I have not found any signs of coolant in the oil, only oil in the coolant. The oil is getting changed and that will be the extent of that. The engine has 210k on it. I will ride the stock bottom end out as long as it lasts. At least that is my plan for now. If I can get some solid power running through it and get some great track times I will start throwing parts at the bottom end granted it is still intact. These bottom ends have seen 1000hp untouched. Quote Link to comment Share on other sites More sharing options...
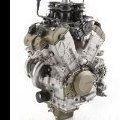
XChris1632X Posted July 9, 2012 Author Report Share Posted July 9, 2012 The street level port job is done and the head is still at the machine shop. It got .012 taken off of it and the valves put back to original location. In the meantime I picked up a donor truck. Im parting out the entire truck with the exception of the P7100 injection pump and related parts to convert from the VP44 pump currently on my truck. http://i282.photobucket.com/albums/kk251/XChris1632X/Random/IMAG0547.jpg http://i282.photobucket.com/albums/kk251/XChris1632X/Random/IMAG0559.jpg This is the ugly bitch that will most likely power the truck the next time it runs, or either be a core for the replacement. http://i282.photobucket.com/albums/kk251/XChris1632X/Random/IMAG0561.jpg The only problem is that I found no fuel in the line on #4 and knew that the truck had sat awhile. The barrel is most likely sticking. Im not excited about working with a 160 pump or dumping much money into it. My plans are for a 13mm pump but I have got over 4k going into this wave of parts with the p-pump swap, cam, head studs, and machine work. This might have to last me until I can dump another 3k on just a pump. Quote Link to comment Share on other sites More sharing options...
XChris1632X Posted November 22, 2012 Author Report Share Posted November 22, 2012 (edited) I have been really busy with kids football, vacation, work, ect. No different than anyone else but I just stuck my truck on the back burner. I don't plan on having it come out until spring anyways. Most of the delay was due to getting the donor truck stripped, parts sold, and getting it out of the shop so I could get back to work on this. I got the head back from the machine shop. Before had a did a little prep to the block before the head stud install. I took a little extra step that is not required and one that not everyone does. This entails bottom tapping the block. In each threaded hole of the block the threads stop a fair distance before the bottom of the hole. Bottom tapping ensures that each stud has more thread contact, fits down in the holes evenly, and allows for no clearance issues with the valve cover. http://i282.photobucket.com/albums/kk251/XChris1632X/Toys/Hannah/IMAG0587.jpg Since I dumped some money into the head and already had it off I decided to give it a quick paint job. Not really the color I had hoped for but it will do for now. This head is only temporary anyways. http://i282.photobucket.com/albums/kk251/XChris1632X/Toys/Hannah/IMAG0581.jpg While the head was away I decided to take another step with it and have the cylinders o-ringed. http://i282.photobucket.com/albums/kk251/XChris1632X/Toys/Hannah/IMAG0618.jpg Shitty pic of the rings. Edited November 23, 2012 by I Drive It... It Breaks! Quote Link to comment Share on other sites More sharing options...
XChris1632X Posted November 23, 2012 Author Report Share Posted November 23, 2012 Another shitty pic of the rings http://i282.photobucket.com/albums/kk251/XChris1632X/Toys/Hannah/IMAG0619.jpg I would have taken better pics but I forgot until I was about to set the head on. When I started cleaning up the bowls in the head I quickly realized that my valve seats had some cracking. Basically the head is junk. It could last 4 hours, it could last 4 months. I dropped it off to get it resurfaced and oringed anyways. My plan is to get it through 1 season. Next year the plan will be to get a new head and completely build it with orings, stronger port work, mill the intake off and build a runner style plenum. Using a OEM headgasket for the Orings. http://i282.photobucket.com/albums/kk251/XChris1632X/Toys/Hannah/IMAG0615.jpg http://i282.photobucket.com/albums/kk251/XChris1632X/Toys/Hannah/IMAG0622.jpg http://i282.photobucket.com/albums/kk251/XChris1632X/Toys/Hannah/IMAG0621.jpg http://i282.photobucket.com/albums/kk251/XChris1632X/Toys/Hannah/IMAG0636.jpg Im going to wait to put the rest of the top end together until I get the cam swapped. The cam will be the next thing to get done which will enable me to get to swap the the timing case out. In the next week or so I am going to go ahead and get the cam and tappets pulled so that I can swap the timing case. I have to do the same thing on the donor truck to be able to remove the timing case from it also. Quote Link to comment Share on other sites More sharing options...
Nickey4271647545519 Posted November 23, 2012 Report Share Posted November 23, 2012 Why didn't you have the stock intake milled off why you were at it? Quote Link to comment Share on other sites More sharing options...
XChris1632X Posted November 23, 2012 Author Report Share Posted November 23, 2012 Money. With the rest of the build there was no room to buy another head and then dump $1800 into it. $350 was much easier to swallow for the time being. Quote Link to comment Share on other sites More sharing options...


Recommended Posts
Join the conversation
You can post now and register later. If you have an account, sign in now to post with your account.