

jonni black
-
Posts
186 -
Joined
-
Last visited
Content Type
Profiles
Forums
Gallery
Store
Events
Everything posted by jonni black
-
if i can make it i will be there. working on a project this week but it should be done on wednesday
-
Dainese 2 piece leather track suit FOR SALE! Size 46/56
jonni black replied to Dubguy85's topic in LBTS GLWS
that is a great price. my buddy may want it. -
i'll be there.
-
for light street riding i use the icon leg armor http://www.google.com/products?client=firefox-a&rls=org.mozilla:en-US:official&channel=s&hl=en&q=icon+leg+armor&um=1&ie=UTF-8&ei=sfjJS6HJFJKKNoa4_csF&sa=X&oi=product_result_group&ct=image&resnum=3&ved=0CBkQzAMwAg and the bohn adventure short http://stores.sportbiketrackgear.com/Detail.bok?no=22 but nothing will be a pair of leather pants.
-
welcome!
-
that dude was going slow as shit. you wanna see a motherfucker flying draggin knee on a goldwing check this vid from deals gap. http://www.youtube.com/watch?v=0nrMQ3QwyPo yellow dragon!!
-
thanks nick. the write up was the least i could do for the hook up on a FREE speedo healer.
-
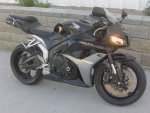
Hi All, Recently I was selected by 12'oclock Labs ( http://www.12oclocklabs.com/ ) to road test the new plug and play speedo healer. If you have ever swapped out your stock sprockets you are aware that by changing the amount of teeth on your spockets throws off your speedometer reading. This speedo healer is this first plug n play calibrator for the 2007-2010 CBR600RR (all other calibrators require wire splicing) Anyhow I figured I would do a write up on the simplicity of installing of the speedoDRD. I am by no means the most mechanically inclined person and this is my first DIY write so please bear with me and feel free to contribute. The speed sensor is located above the transmission and below the gas tank. The easiest way to access the sensor is by removing the tank fairing, and tank bolts Once the tank fairing has been removed located the speed sensor wire harness located above the transmission. (the speed sensor harness has violet, green, and pink wires on one side and red, back, white and green on the other) After locateing the wiring harness disconnect it and connect the speedoDRD directly to the male and female ends of the speed sensor. once you have it connected you can either run it out the side near the shift rod or route it up above your airbox i choose to route it above the airbox. reason being is that i was required to do a quick roadtest and verify that the maxspeed feature was working properly. in order to perform this test you have to be able to access the board rather easily after riding (it only save the maxspeed from your most recent ride). for the roadtest i used zip ties to mount the sensor slightly above the shift rod. above the transmission near the original speed sensor harness. after a quick five mile ride i tested the max speed feature and noticed that the board got extremely hot. a little worried i would melt the board i choose to reroute the board above the airbox. by doing this i will not be able to use the max speed feature unless i remove the tank fairing. 12 o'clock labs has a calculator on there website to determine your calibration factor. they use an equation based on your stock sprocket teeth and what you have changed them to. in my case my stock sprockets were 16, and 42. my aftermarket sprockets are 15, and 43. my cal factor is -10.4% using that cal factor programming the sensor took less than 5 minutes. got it right the first time and once the test is complete it verifies the cal factor. 12 o'clock labs also has a youtube vid on programming the sensor. i am sure i forgot something, and will add it as needed. that is all for now thanks for reading my first DIY. i hope my broken grammar didnt give you a headache.
-
you know we are!
-
what does tb mean?
-
Who has one of the new CBR's and lives near Troy?
jonni black replied to 12oclocker's topic in Daily Ride
fixed i think. -
Who has one of the new CBR's and lives near Troy?
jonni black replied to 12oclocker's topic in Daily Ride
pic fail? -
Who has one of the new CBR's and lives near Troy?
jonni black replied to 12oclocker's topic in Daily Ride
-
Who has one of the new CBR's and lives near Troy?
jonni black replied to 12oclocker's topic in Daily Ride
just got home. mad traffic getting there all sort of construction took forever. the ride back was nice though. almost no traffic after rush hour. this calibrator looks amazing. direct plug and play fit. no wire splicing. if i have time after dinner i will try to install it and will post up pictures. much thanks to brooks and 12oclock labs!!! i am honored to be your guinea pig! -
Who has one of the new CBR's and lives near Troy?
jonni black replied to 12oclocker's topic in Daily Ride
woohoo!!!!! leaving in 30 minutes! -
Who has one of the new CBR's and lives near Troy?
jonni black replied to 12oclocker's topic in Daily Ride
thanks. i am off work today, and troy is only 70 miles from cincy. -
Who has one of the new CBR's and lives near Troy?
jonni black replied to 12oclocker's topic in Daily Ride
i can be up there today. still available? -
Who has one of the new CBR's and lives near Troy?
jonni black replied to 12oclocker's topic in Daily Ride
i am tempted to drive up from cincy for this if it is still available. my speedo has been messed up since i swapped out the sprockets (-1,+1) -
i got a b stone 180. like new but has a plug. you are welcome to it if you want it.
-
you are right. you dont know me. and if you ever rode with me you would know that i am normally the last guy in the group riding the SLOWEST. i was around last season and you are also correct about someone crashing EVERY weekend. most of the time they could ride their bike home. on several other occasions they could not. i did have a highside last year on 915 but considering the circumstances that caused my accident, there wasnt much else i could do. but we live and learn and move on.
-
also i would try salvage/junk yards. we have a couple pull and pay places here in cincinnati where you can get parts dirt cheap.
-
take 471 to 275 towards the airport. get off the wilder exit, turn left then 915 is on your right. 915 will take you to 10/165/1504/22 you are more than welcome to join the group ride. we will more than likely have 2 groups. a faster group and a slower group. we always wait for everyone at stop signs and intersections. no one every gets left behind.
-
get the parts online and do the work yourself. parts will cost less than 1200.
-
yes since that was my intention and all. you got something to say, then you should stop by shell on saturday. i am just trying to be friendly and invite some of you OR folks to ride with us.