wnaplay Posted July 10, 2008 Report Share Posted July 10, 2008 I need to clean the carbs in a last ditch effort to try and get the bike running right before taking it to a mechanic and spending money the wife wont let me touch. It runs rough after riding it for about 15-20 mins. I can still ride it on the freeway but it definately runs rough. If it sits for awhile its fine again until after another 15-20 mins. I have the carbs exposed but what now? Should I just take the float bowels off with the carbs still attached? Or do I need to take the carbs completely off? What is the process to get these cleaned out? The bike is a 98 cbr900rr that I put together last year. It ran great for a few months and then this problem. I replaced the plugs right after the problem started but it still happened. Any ideas? Thanks Quote Link to comment Share on other sites More sharing options...
John Posted July 10, 2008 Report Share Posted July 10, 2008 have you checked your tank vent? Quote Link to comment Share on other sites More sharing options...
wnaplay Posted July 10, 2008 Author Report Share Posted July 10, 2008 have you checked your tank vent?I have not, are you talking about the rubber hose coming off the bottom of the tank? Quote Link to comment Share on other sites More sharing options...
John Posted July 11, 2008 Report Share Posted July 11, 2008 im not exactly sure where it is on a CBR. someone else will have to chime in with that. but if it gets clogged or kinked or whatever, what happens is, as gas gets sucked out of the tank, it creates a vacuum in the top of the tank. eventually it sucking harder UP into the tank than it is OUT of the tank, and fuel starvation occurs.you turn it off and let it sit, and the pressure equalizes after a while, and it starts and runs fine again... until the vacuum builds up again.two questions: 1. if it runs rough and you turn it off, then wait less than 15 minutes, say 3 minutes, and try to run it again, does it still run rough?2. do you ever hear a whooshing noise when you open the gas cap? if you can still run the bike, id try to run it for a bit until it starts to run rough again, then if you have an extra key, pop open the tank and see if it runs better. if you dont have an extra key and your answer to number 1 is "yes", then turn it off, open the tank (listen for a whoosh like opening a can of tennis balls or something) then close it up and try to run again. Quote Link to comment Share on other sites More sharing options...
John Posted July 11, 2008 Report Share Posted July 11, 2008 also, you need to take the whole rack of carbs off to clean them. you gotta take out the jets and make sure they are not clogged. if you just take the bowls off, you can clean them out, but that doesnt help the jets. then you just got clean bowls Quote Link to comment Share on other sites More sharing options...
wnaplay Posted July 11, 2008 Author Report Share Posted July 11, 2008 I will probably just have to take the damn thing to a mechanic. OH well. Quote Link to comment Share on other sites More sharing options...
jnjtrukin Posted July 11, 2008 Report Share Posted July 11, 2008 I'm not sure exactly what kind of bike you have, but I have a 99 CBR 600F4 and I was able to use this guide to take mine apart and clean them when I was having a problem with the bike cutting out on me. It doesn't cover getting them out of the bike, but I would just remove the tank completely as it makes it easier to get in there... You'll also need a really long screwdriver(like 10-12") to go through the frame to loosen the bands that hold the carbs onto the gasket connecting to the top of the motor.http://www.cbrforum.com/m_311016/mpage_1/key_/tm.htmHope this helps...Jason Quote Link to comment Share on other sites More sharing options...
jnjtrukin Posted July 11, 2008 Report Share Posted July 11, 2008 You can also test to see if it's the fuel pump pretty easily if it's a carb model since they don't require much pressure...You just setup an IV bag type of setup where it hangs above the bike with tubing connecting to the hose for the fuel rail. This way you're routing around the fuel pump. One gotcha to this I found was that the wires that connect to the tank must be connected for the bike to start....This helps you determine if the fuel pump/filter is the issue, or if the carbs are the issue.Jason Quote Link to comment Share on other sites More sharing options...
wnaplay Posted July 11, 2008 Author Report Share Posted July 11, 2008 The write up looks good but there are a few unanswered questions in it. Like the the syncro question. If I fuck up taking these apart, can anyone help putting them back together? Quote Link to comment Share on other sites More sharing options...
dustinsn3485 Posted July 11, 2008 Report Share Posted July 11, 2008 Synch is easy. There was a thread on it a few days ago. Satan has a method of using paper clips and I use a feeler guage. Click this for the threadThere's no reason to break them apart. Pull them off the bike and leave the bank together. You might be able to take them to a dealer off the bike and have them rebuild them and soak them in a carb tank to make sure to get anything that is in the passages.If it wasn't such a far drive for you, I'd help you out. Quote Link to comment Share on other sites More sharing options...
wnaplay Posted July 11, 2008 Author Report Share Posted July 11, 2008 You only need to resync if you break the bank? Quote Link to comment Share on other sites More sharing options...
dustinsn3485 Posted July 11, 2008 Report Share Posted July 11, 2008 Yes and no. It's a good idea whenever the carbs are off the bike to check the sync. Just because it's easy to and there's no reason not to. If you are having a rough running issue the sync could be partly to blame. If you break the bank apart then definitely though. Quote Link to comment Share on other sites More sharing options...
wnaplay Posted July 11, 2008 Author Report Share Posted July 11, 2008 The carbs are off and I have taken off the cups, removed the floats. These areas appear to be very clean. Now what do I need to do with these covers off? I see what appears to be the needles. Are there more than 1. Do I need to take these out and if so how do I get them put back in the right way? Do you sync lastly? Quote Link to comment Share on other sites More sharing options...
dustinsn3485 Posted July 11, 2008 Report Share Posted July 11, 2008 There is a float needle for each carb and a jet needle for each carb.The float needle is part of the float. The jet needle can be removed by pulling the diaphram cover off of the top of the carb. I'm not going to do a very good job of explaining this, I'm heading out of town in -5 min. Basically you need to remove all the jets (they have slots for a flat blade screwdriver) then use carb cleaner and spray them out and then using carb cleaner and compressed air spray every single passage you see on the carb assembly itself. Common knowledge should tell you that if you spray into one side of the passage something should come out the other side...Hopefully someone else will jump on here and try to answer questions as you go..One other idea. Take pictures at each dissassembly step to help you remember where stuff goes if you are unfamiliar with what you see.Sorry I can't hang around longer. Quote Link to comment Share on other sites More sharing options...
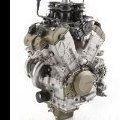
wnaplay Posted July 11, 2008 Author Report Share Posted July 11, 2008 Heres what I have so far what numbers come out? And do I just screw them back in snuggly?Heres a reference pic I found Quote Link to comment Share on other sites More sharing options...
wnaplay Posted July 11, 2008 Author Report Share Posted July 11, 2008 1=main jet2=nothing3=nothing4=slow jet5=nothing6=pilot screw housing(screw not seen in pic)7=nothing Quote Link to comment Share on other sites More sharing options...
dustinsn3485 Posted July 11, 2008 Report Share Posted July 11, 2008 1 and 4Your main and slow jet. And yes then just screw them back in and snug.I'm not sure on your bike, but sometimes 3 is removable and there is a screen behind it that I've seen crap in before. That is the float needle seat.Also the air/fuel screw can come out. inside number 6. But there is most likely a plug on top of it that needs to be removed. A drill is needed for that. That will allow you to clean that passage as well. Quote Link to comment Share on other sites More sharing options...
wnaplay Posted July 11, 2008 Author Report Share Posted July 11, 2008 I have taken these out except for the pilot screw. The pilot screw appears to be an adjustment screw and I am not sure what the proper method for adjusting this crew is, should I take it out. I have taken apart the black covers on the reverse side and removed the spring, rubber vacuum piece. with the long needle attached to it. Not sure if this needle comes out or not. Everything including the needles I have taken out appear to be brand new. Not a visible speck of dirt or anything. The holes in the needles appear to be completely clean. I guess at this point, I will spray everything down with carb cleaner and reassemble. Should I take the pilot screw out? And if so, what is the rule of thumb for adjusting this? Quote Link to comment Share on other sites More sharing options...
wnaplay Posted July 11, 2008 Author Report Share Posted July 11, 2008 Well everything is apart at this point, not the entire bank, but the jets are out, pilot screw and springs, floats, needles. I guess I will put everything back together in reverse order. Just not sure about the pilot screws positioning, and syncing. I read about the paperclip idea but not sure exactly where to place it and what screw(?) I am adjusting. Can anyone shed some light on this? Can I do this with the carbs off the bike? Quote Link to comment Share on other sites More sharing options...
wnaplay Posted July 12, 2008 Author Report Share Posted July 12, 2008 Damn, has anyone come up with a good way of getting the vacuum springs back in? Quote Link to comment Share on other sites More sharing options...
wnaplay Posted July 12, 2008 Author Report Share Posted July 12, 2008 Everything is back together except for the pilot screws. Anyone on the adjustment? I did gauge based on revolutions of the screws how far I needed to unscew them to get them out, is this how I should put them back in? Quote Link to comment Share on other sites More sharing options...
John Posted July 12, 2008 Report Share Posted July 12, 2008 you should screw them in until they seat, and count how many turns you had to make for them to seat.i would screw them in until they seat, then turn em about about 2.5 turns as a starting point.or you can start the bike, screw them in until it starts to run rough, then screw them out until it starts to run rough, then set them in between those 2 points. Quote Link to comment Share on other sites More sharing options...
wnaplay Posted July 12, 2008 Author Report Share Posted July 12, 2008 Is this kinda like syncing the carbs? Why would these need to be adjusted? Quote Link to comment Share on other sites More sharing options...


Recommended Posts
Join the conversation
You can post now and register later. If you have an account, sign in now to post with your account.